AspectJ 编译器增强 创建一个 SpringBoot 项目,除了常见的依赖外,记得导入 AOP 相关的依赖:
1 2 3 4 <dependency > <groupId > org.springframework.boot</groupId > <artifactId > spring-boot-starter-aop</artifactId > </dependency >
一个 Service 类:
1
2
3
4
5
6
7
@Service public class MyService { private static final Logger log = LoggerFactory.getLogger(MyService.class); public void foo () { log.info("foo()" ); } }
一个切面类,注意这个切面类没有被 Spring 管理:
1
2
3
4
5
6
7
8
9
@Aspect public class MyAspect { private static final Logger log = LoggerFactory.getLogger(MyAspect.class); @Before("execution(* indi.mofan.service.MyService.foo())") public void before () { log.info("before()" ); } }
一个用于测试的主启动类:
1
2
3
4
5
6
7
8
9
10
11
12
13
14
@SpringBootApplication public class A10Application { private static final Logger log = LoggerFactory.getLogger(A10Application.class); public static void main (String[] args) { ConfigurableApplicationContext context = SpringApplication.run(A10Application.class, args); MyService service = context.getBean(MyService.class); log.info("service class: {}" , service.getClass()); service.foo(); context.close(); } }
运行主启动类后,控制台会显示:
1
2
3
indi.mofan.A10Application : service class: class indi.mofan.service.MyService indi.mofan.aop.MyAspect : before() indi.mofan.service.MyService : foo()
如果完全按照上述步骤进行,会发现 输出结果和给出的结果不一样。
在揭晓答案前,查看 service.getClass() 打印出的信息,它打印出的是原始类的 Class 信息,而非代理类的 Class 信息。
如果要问到 Spring AOP 的实现原理是什么,一下就能想到的是使用了代理,但这里并没有使用代理,依旧实现了增强。
这是因为在 pom.xml 中还引入了一个插件:
1 2 3 4 5 6 7 8 9 10 11 12 13 14 15 16 17 18 19 20 21 22 23 24 25 26 27 28 <build > <plugins > <plugin > <groupId > org.codehaus.mojo</groupId > <artifactId > aspectj-maven-plugin</artifactId > <version > 1.11</version > <configuration > <complianceLevel > 1.8</complianceLevel > <source > 8</source > <target > 8</target > <showWeaveInfo > true</showWeaveInfo > <verbose > true</verbose > <Xlint > ignore</Xlint > <encoding > UTF-8</encoding > </configuration > <executions > <execution > <goals > <goal > compile</goal > <goal > test-compile</goal > </goals > </execution > </executions > </plugin > </plugins > </build >
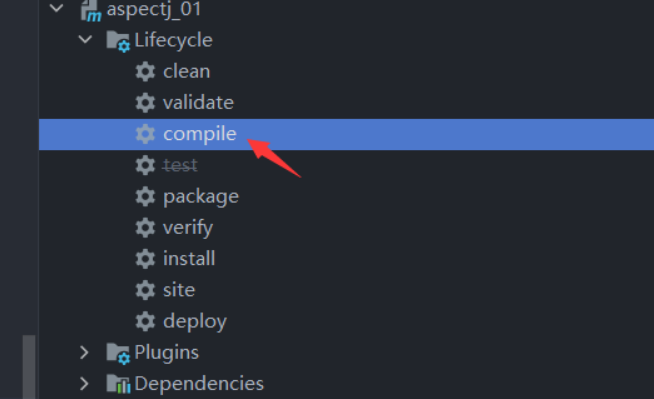
之后不在使用 IDEA 自带的编译器进行编译,而是使用 Maven 编译,即:
编译之后查看生成的 target 文件夹下的 MyService.class 文件:
1
2
3
4
5
6
7
8
9
10
11
12
@Service public class MyService { private static final Logger log = LoggerFactory.getLogger(MyService.class); public MyService () { } public void foo () { MyAspect.aspectOf().before(); log.info("foo()" ); } }
可以看到在 foo() 方法中增加了一行代码:MyAspect.aspectOf().before();,也就是这行代码对 foo() 方法实现了增强。
这种方式属于编译时增强,和 Lombok 类似。
既然如此,那岂不是说使用这种方式时,没有 Spring 容器也能实现方法的增强?
确实如此。
1
2
3
4
5
6
7
8
9
public class A10Application { private static final Logger log = LoggerFactory.getLogger(A10Application.class); public static void main (String[] args) { MyService service = new MyService (); log.info("service class: {}" , service.getClass()); service.foo(); } }
1
2
3
indi.mofan.A10Application - service class: class indi.mofan.service.MyService indi.mofan.aop.MyAspect - before() indi.mofan.service.MyService - foo()
除此之外,使用这种方式,就算 foo() 方法是静态方法,也能够成功增强。
1
2
3
4
5
6
public class MyService { private static final Logger log = LoggerFactory.getLogger(MyService.class); public static void foo () { log.info("foo()" ); } }
1
2
3
4
5
public class A10Application { public static void main (String[] args) { MyService.foo(); } }
1
2
di.mofan.aop.MyAspect - before() indi.mofan.service.MyService - foo()
遇到的一些问题
答:本节只是做个小测试,实际开发时一般不会这么使用,因此移除 Lombok 的注解即可。比如本节采用的日志打印方式不再使用 @Slf4j,而是使用了诸如以下的方式:
1 private static final Logger log = LoggerFactory.getLogger(MyService.class);
完全按照一样的步骤进行,但运行后的方法依旧没有增强。
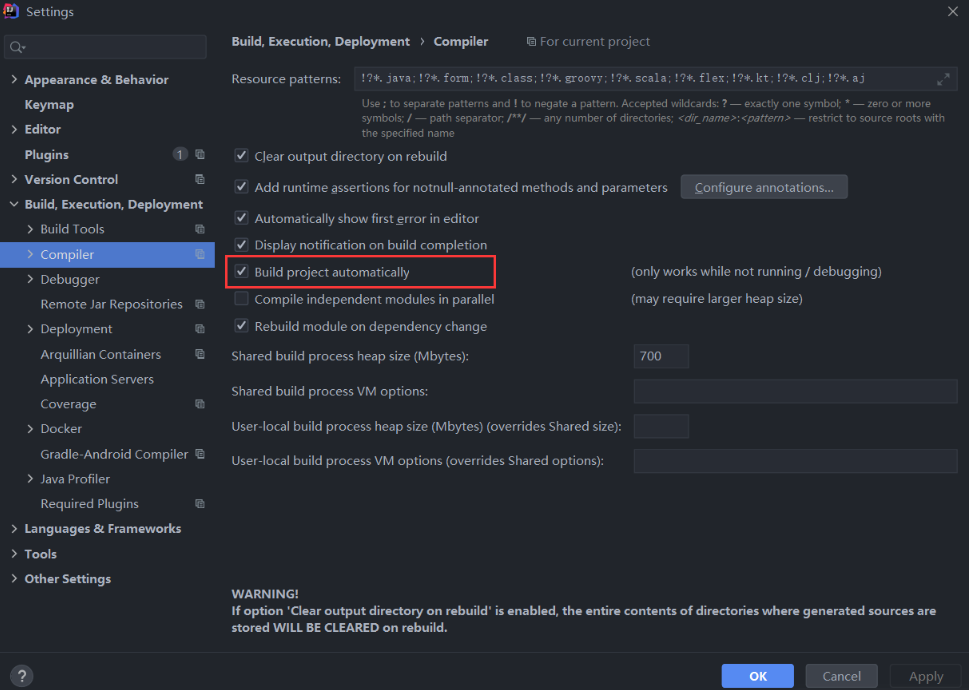
答:这是由于 IDEA 在执行代码前又编译了一遍代码,覆盖了使用 Maven 编译生成字节码文件,导致增强失败。对 IDEA 进行设置,勾选 自动构建项目:
尽量使用 JDK8,因为 aspectj-maven-plugin 可能暂不支持高版本的 JDK。
Agent 类加载 使用 Agent 类加载 重新创建一个 SpringBoot 项目,同样需要导入 AOP 相关的依赖。
一个 Service 类:
1
2
3
4
5
6
7
8
9
10
11
12
@Slf4j @Service public class MyService { final public void foo () { log.info("foo()" ); bar(); } public void bar () { log.info("bar()" ); } }
一个切面类,注意这个切面类没有被 Spring 管理:
1
2
3
4
5
6
7
8
9
@Slf4j @Aspect public class MyAspect { @Before("execution(* indi.mofan.service.MyService.*())") public void before () { log.info("before()" ); } }
一个用于测试的主启动类:
1
2
3
4
5
6
7
8
9
10
11
@Slf4j @SpringBootApplication public class A11Application { public static void main (String[] args) { ConfigurableApplicationContext context = SpringApplication.run(A11Application.class, args); MyService service = context.getBean(MyService.class); log.info("service class: {}" , service.getClass()); service.foo(); } }
运行主启动类后,控制台会显示:
1
2
3
4
5
ndi.mofan.A11Application : service class: class indi.mofan.service.MyService indi.mofan.aop.MyAspect : before() indi.mofan.service.MyService : foo() indi.mofan.aop.MyAspect : before() indi.mofan.service.MyService : bar()
如果完全按照上述步骤进行,会发现输出结果和给出的结果不一样。
那是怎么达到增强的效果呢?
首先得在 resources 目录下新建 META-INF 文件夹,并在 META-INF 目录下新建 aop.xml 文件,其内容如下:
1 2 3 4 5 6 7 8 9 10 11 12 <aspectj > <aspects > <aspect name ="indi.mofan.aop.MyAspect" /> <weaver options ="-verbose -showWeaveInfo" > <include within ="indi.mofan.service.MyService" /> <include within ="indi.mofan.aop.MyAspect" /> </weaver > </aspects > </aspectj >
在运行 main() 方法前添加 VM options:
1 -javaagent:D:\environment\Maven\3.6.3-repository\.m2\repository\org\aspectj\aspectjweaver\1.9.7\aspectjweaver-1.9.7.jar
其中的 D:\environment\Maven\3.6.3-repository.m2 指本地 Maven 仓库地址,还需要确保本地仓库中存在 1.9.7 版本的 aspectjweaver,否则修改至对应版本。
这是控制台输出的信息就和前文的内容一样了。
从输出的内容可以看到 service.getClass() 打印出的信息也是原始类的 Class 信息,而非代理类的 Class 信息。因此不依赖 Spring 容器,直接 new 一个 MyService 实例并调用其 foo() 方法也能达到增强的目的。
如果查看 MyService 对应的 class 文件,会发现其内容并没有被修改,可以断定不是编译时增强,这里是在类加载时增强。
利用 Arthas 反编译类文件 可以借助阿里巴巴的 Arthas 来反编译加载的类文件,下载地址:下载 | arthas
在使用 Arthas 前,需要确保对应 Java 进程的存在,因此在上述代码中调用 service.foo(); 方法后并没有关闭 Spring 容器。
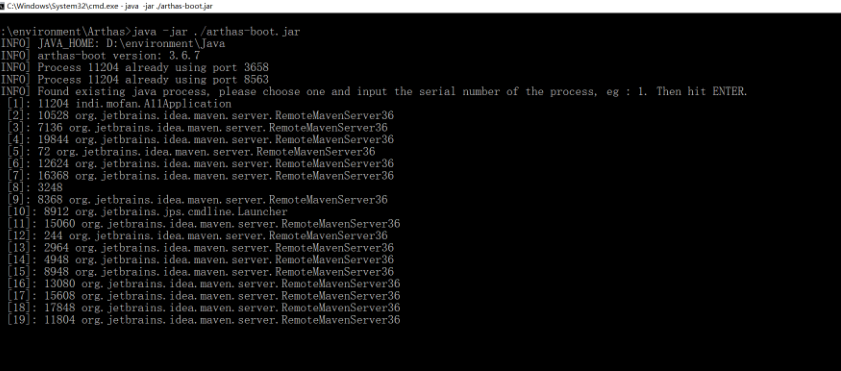
解压下载的压缩包,进入 arthas-boot.jar 文件的同级目录,java -jar .\arthas-boot.jar:
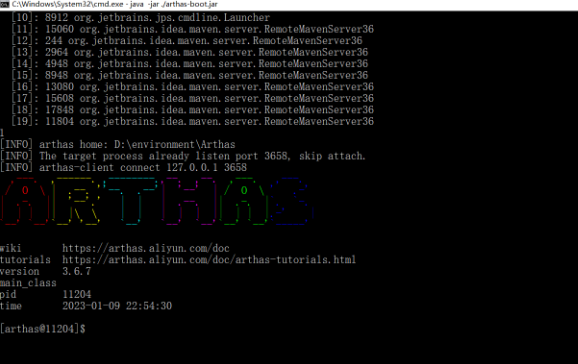
运行之后会列举出存在的 Java 进程,找到需要连接的进程,之后输入目标进程对应的序号。当界面上成功显示 Arthas 的 Banner 时,证明连接成功:
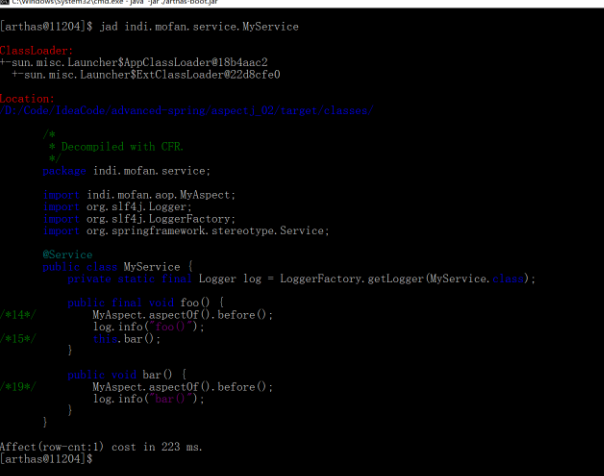
输入 jad indi.mofan.service.MyService 表示需要反编译 MyService:
可以看到 foo() 和 bar() 方法的第一行都被增加了一行代码,也就是这行代码对这两个方法实现了增强。
不仅如此,如果使用代理实现增强,被调用的 bar() 方法不会被成功增强,因为调用时默认使用了 this 关键词,表示调用的是原类中的方法,而不是代理类中的方法(经典面试题:@Transactional 注解失效的场景)。
JDK 代理 JDK 动态代理实现 JDK 动态代理 只能 针对接口进行代理
1 2 3 4 5 6 7 8 9 10 11 12 13 14 15 16 17 18 19 20 21 22 23 24 25 26 27 28 29 30 31 32 33 34 35 36 37 38 39 40 public class JdkProxyDemo { interface foo { void foo () ; } static class FooImpl implements foo { @Override public void foo () { System.out.println("foo" ); } } public static void main (String[] args) { FooImpl foo = new FooImpl (); foo proxy = (foo) Proxy.newProxyInstance(JdkProxyDemo.class.getClassLoader(), new Class []{foo.class}, (proxy1, method, args1) -> { System.out.println("before" ); Object result = method.invoke(foo, args1); System.out.println("after..." ); return result; }); proxy.foo(); System.out.println("-------" ); proxy.toString(); System.out.println("-------" ); proxy.hashCode(); System.out.println("-------" ); System.out.println(proxy.equals(proxy)); } }
1
2
3
4
5
6
7
8
9
10
11
12
13
before foo after... ------- before after... ------- before after... ------- before after... false
总结
代理对象和目标对象是兄弟关系,都实现了相同接口,所以不能将代理对象强转成目标对象类型
代理类与目标之间没有继承关系,所以目标类可以被 final修饰
JDK 动态代理原理 jdk 代理基于接口,底层是生成一个增强的 class$Proxy0实现代理接口 Foo
1
2
3
4
5
6
7
8
9
10
11
12
13
14
15
16
17
18
19
20
21
22
23
24
25
interface Foo { void foo () ; } static class Target implements Foo { @Override public void foo () { System.out.println("target foo" ); } } public class $Proxy0 implements A13 .Foo{ @Override public void foo () { System.out.println("before..." ); new A13 .Target().foo(); } } public static void main (String[] args) { $Proxy0 proxy = new $Proxy0 (); proxy.foo(); }
可是 实际的 代理内容里的 功能增强 和 调用目标 是不确定的,MyInvocationHandler
1
2
3
4
5
6
7
8
9
10
11
12
13
14
15
16
17
18
19
20
21
22
23
24
25
26
27
28
29
30
31
32
33
34
35
36
37
38
39
40
41
interface Foo { void foo () ; } static class Target implements Foo { @Override public void foo () { System.out.println("target foo" ); } } interface InvocationHandler { void invoke () ; } public class $Proxy0 implements A13 .Foo{ private final A13.InvocationHandler h; public $Proxy0(A13.InvocationHandler h) { this .h = h; } @Override public void foo () { h.invoke(); } } public static void main (String[] args) { $Proxy0 proxy = new $Proxy0 (new InvocationHandler () { @Override public void invoke () { System.out.println("before..." ); new A13 .Target().foo(); } }); proxy.foo(); }
多个抽象方法的接口 是不是有点眉目了,别急别急如果代理接口 Foo 里多个抽象方法,那么会出现问题:
1 2 3 4 5 interface Foo { void foo () ; void boo () ; }
目标类代理类都新增 boo 方法
1 2 3 4 5 6 7 8 9 10 11 12 13 14 15 16 17 18 19 20 21 22 23 24 25 26 27 28 29 30 31 32 33 34 35 36 37 38 39 40 41 42 43 44 45 static class Target implements Foo { @Override public void foo () { System.out.println("target foo" ); } @Override public void boo () { System.out.println("target boo" ); } } public class $Proxy0 implements A13 .Foo{ private final A13.InvocationHandler h; public $Proxy0(A13.InvocationHandler h) { this .h = h; } @Override public void foo () { h.invoke(); } @Override public void boo () { h.invoke(); } } public static void main (String[] args) { $Proxy0 proxy = new $Proxy0 (new InvocationHandler () { @Override public void invoke () { System.out.println("before..." ); new A13 .Target().foo(); } }); proxy.foo(); proxy.boo(); }
1 2 3 4 before... target foo before... target foo
打印结果有点问题。当调用代理对象的 boo() 方法时,输出了 target foo,而不是 barboo) 方法应该打印的 target boo。
原因就出在实现 InvocationHandler 的 invoke() 方法时,依旧只调用了目标类的 foo() 方法,而不是 boo() 方法。
也就是说,在调用代理对象中的某个方法时,增强的应该是目标对象中对应的方法,希望在调用目标方法时能够动态编码。
那么可以在 invoke() 方法中添加两个入参,分别表示需要调用的目标方法和目标方法的参数:
1 2 3 interface InvocationHandler { void invoke (Method method, Object[] params) throws Throwable; }
增加参数之后需要修改代理类,并将实现的抽象方法的 Method 对象与参数传递给 invoke() 方法:
1 2 3 4 5 6 7 8 9 10 11 12 13 14 15 16 17 18 19 20 21 22 public class $Proxy0 implements A13 .Foo{ private final A13.InvocationHandler h; public $Proxy0(A13.InvocationHandler h) { this .h = h; } @Override @SneakyThrows public void foo () { Method method = A13.Foo.class.getMethod("foo" ); h.invoke(method, new Object [0 ]); } @Override @SneakyThrows public void boo () { Method method = A13.Foo.class.getMethod("boo" ); h.invoke(method, new Object [0 ]); } }
还需要修改下 main() 方法中 InvocationHandler 的实现,利用传递的 Method 对象和参数信息反射调用目标方法:
1 2 3 4 5 6 7 8 9 10 11 12 13 14 public static void main (String[] args) { $Proxy0 proxy = new $Proxy0 (new InvocationHandler () { @Override public void invoke (Method method, Object[] params) throws Throwable { System.out.println("before..." ); Object invoke = method.invoke(new Target (), params); } }); proxy.foo(); proxy.boo(); }
1 2 3 4 before... target foo before... target boo
异常的抛出处理 jdk 分 运行异常 和 检查异常
1 2 3 4 5 6 7 8 9 10 11 12 13 14 15 16 public class $Proxy0 implements A13 .Foo { @Override public void foo () { try { h.invoke(foo, new Object [0 ]); } catch (RuntimeException | Error e) { throw e; } catch (Throwable e) { throw new UndeclaredThrowableException (e); } } }
有返回值的抽象方法 优化还在继续,如果抽象方法有返回值呢?比如:
1 2 3 4 5 interface Foo { void foo () ; int boo () ; }
实现了这个接口的目标类和代理类重写的方法都需要有具体的返回值:
1 2 3 4 5 6 7 8 9 10 11 12 static class Target implements Foo { @Override public void foo () { System.out.println("target foo" ); } @Override public int boo () { System.out.println("target bar" ); return 100 ; } }
目标类很简单,直接返回,那代理类返回什么?
InvocationHandler 的 invoke() 方法是对“功能增强”和“调用目标”的抽象,因此可以使 invoke() 方法也返回一个值,返回的值即为目标方法的返回值,这样就可以使得代理类中的方法有值可返。
1 2 3 interface InvocationHandler { Object invoke (Method method, Object[] params) throws Throwable; }
1 2 3 4 5 6 7 8 9 10 11 12 13 14 15 16 17 18 19 20 21 22 23 24 25 26 27 28 29 30 31 32 public class $Proxy0 implements A13 .Foo { private final A13.InvocationHandler h; public $Proxy0(A13.InvocationHandler h) { this .h = h; } @Override public void foo () { try { Method foo = A13.Foo.class.getMethod("foo" ); h.invoke(foo, new Object [0 ]); } catch (RuntimeException | Error e) { throw e; } catch (Throwable e) { throw new UndeclaredThrowableException (e); } } @Override public int boo () { try { Method boo = A13.Foo.class.getMethod("bar" ); return (int ) h.invoke(bar, new Object [0 ]); } catch (RuntimeException | Error e) { throw e; } catch (Throwable e) { throw new UndeclaredThrowableException (e); } } }
修改 main() 方法,打印 boo() 方法的返回值:
1 2 3 4 5 6 7 8 9 10 11 12 13 14 public static void main (String[] args) { $Proxy0 proxy = new $Proxy0 (new InvocationHandler () { @Override public Object invoke (Method method, Object[] params) throws Throwable { System.out.println("before..." ); return method.invoke(new Target (), params); } }); proxy.foo(); System.out.println(proxy.boo()); }
1 2 3 4 5 before... target foo before... target boo 100
在静态代码块里创建 Method 实例 每调用一次代理对象中的方法都会创建一个 Method 实例,这些实例是可以复用的,因此可以将这些实例的创建移动到静态代码块中:
1 2 3 4 5 6 7 8 9 10 11 12 13 14 15 16 17 18 19 20 21 22 23 24 25 26 27 28 29 30 31 32 33 34 35 36 37 38 39 40 41 42 43 public class $Proxy0 implements A13 .Foo { private final A13.InvocationHandler h; public $Proxy0(A13.InvocationHandler h) { this .h = h; } @Override public void foo () { try { h.invoke(foo, new Object [0 ]); } catch (RuntimeException | Error e) { throw e; } catch (Throwable e) { throw new UndeclaredThrowableException (e); } } @Override public int boo () { try { return (int ) h.invoke(boo, new Object [0 ]); } catch (RuntimeException | Error e) { throw e; } catch (Throwable e) { throw new UndeclaredThrowableException (e); } } static Method foo; static Method boo; static { try { foo = A13.Foo.class.getMethod("foo" ); bar = A13.Foo.class.getMethod("boo" ); } catch (NoSuchMethodException e) { throw new NoSuchMethodError (e.getMessage()); } } }
invoke() 增加代理对象参数 在 JDK 提供的 InvocationHandler 接口的 invoke() 方法还将代理对象作为方法的参数,以便用户根据实际情况使用。继续修改自定义的 InvocationHandler 接口:
1 2 3 interface InvocationHandler { Object invoke (Object proxy, Method method, Object[] params) throws Throwable; }
修改代理类中对 invoke() 方法的调用,第一个参数为当前类的实例,即 this:
1 2 3 4 5 6 7 8 9 10 11 12 13 14 15 16 17 18 19 20 21 22 23 24 25 26 27 28 public class $Proxy0 implements A13 .Foo { @Override public void foo () { try { h.invoke(this , foo, new Object [0 ]); } catch (RuntimeException | Error e) { throw e; } catch (Throwable e) { throw new UndeclaredThrowableException (e); } } @Override public int bar () { try { return (int ) h.invoke(this , bar, new Object [0 ]); } catch (RuntimeException | Error e) { throw e; } catch (Throwable e) { throw new UndeclaredThrowableException (e); } } }
main() 方法重写的 invoke() 方法也要增加 proxy 参数:
1 2 3 4 5 6 7 8 9 10 11 12 13 14 public static void main (String[] args) { $Proxy0 proxy = new $Proxy0 (new InvocationHandler () { @Override public Object invoke (Object proxy, Method method, Object[] params) throws Throwable { System.out.println("before..." ); return method.invoke(new Target (), params); } }); proxy.foo(); System.out.println(proxy.boo()); }
向 JDK 靠齐 到此为止,自定义的 InvocationHandler 接口与 JDK 提供的 InvocationHandler 接口无异,注释自定义的 InvocationHandler,更换为 JDK 提供的 InvocationHandler 接口。
在 JDK 提供的 InvocationHandler 接口的注释中有一句:@see Proxy,在 Proxy 类的代码中有:
1 2 3 4 5 6 7 8 9 10 11 12 13 public class Proxy implements java .io.Serializable { protected InvocationHandler h; protected Proxy (InvocationHandler h) { Objects.requireNonNull(h); this .h = h; } }
Proxy 类中有一个 InvocationHandler 对象的成员变量。
因此还可以使代理类 $Proxy0 继承 Proxy 来进一步减少代码:
1 2 3 4 5 6 7 8 9 10 11 12 import java.lang.reflect.InvocationHandler;public class $Proxy0 extends Proxy implements A13 .Foo { private static final long serialVersionUID = -6909541593982979501L ; public $Proxy0(InvocationHandler h) { super (h); } }
JDK 代理类字节码生成 JDK 生成代理类,没有经历源码阶段、编译阶段,而是直接字节码阶段,使用了 ASM 完成
编写接口和代理类:
1 2 3 4 5 6 7 8 9 10 11 12 13 14 15 16 17 18 19 20 21 22 23 24 25 26 27 28 29 30 public interface Foo { void foo () ; } public class $Proxy0 extends Proxy implements Foo { private static final long serialVersionUID = 6059465134835974286L ; static Method foo; static { try { foo = Foo.class.getMethod("foo" ); } catch (NoSuchMethodException e) { throw new NoSuchMethodError (e.getMessage()); } } public $Proxy0(InvocationHandler h) { super (h); } @Override public void foo () { try { this .h.invoke(this , foo, null ); } catch (Throwable throwable) { throw new UndeclaredThrowableException (throwable); } } }
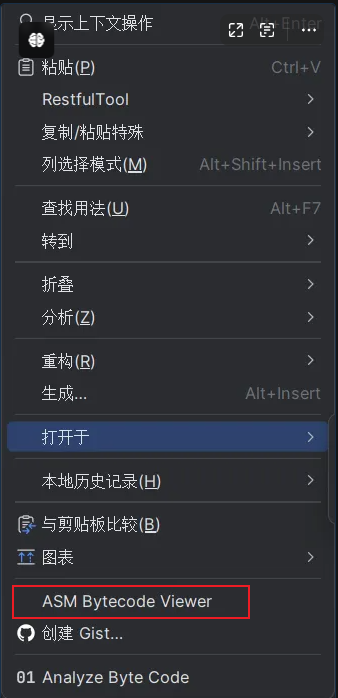
编译上面代码后,在 $Proxy0 文件右击,选择 Show Bytecode Viewer 浏览当前类对应的字节码信息:
1 2 3 4 5 6 7 8 9 10 11 12 13 14 15 16 17 18 19 20 21 22 23 24 25 26 27 28 29 30 31 32 33 34 35 36 37 38 39 40 41 42 43 44 45 46 47 48 49 50 51 52 53 54 55 56 57 58 59 60 61 62 63 64 65 66 67 68 69 70 71 72 73 74 75 76 77 78 79 80 81 82 83 84 85 86 87 88 89 90 91 92 93 94 95 96 97 98 99 100 101 102 103 104 105 106 107 108 109 110 111 112 113 114 115 116 117 118 119 120 121 122 123 124 125 126 127 128 129 130 131 132 133 package com.example.asm;import org.springframework.asm.*;public class $Proxy0Dump implements Opcodes { public static byte [] dump() throws Exception { ClassWriter classWriter = new ClassWriter (0 ); FieldVisitor fieldVisitor; RecordComponentVisitor recordComponentVisitor; MethodVisitor methodVisitor; AnnotationVisitor annotationVisitor0; classWriter.visit(V1_8, ACC_PUBLIC | ACC_SUPER, "com/example/asm/$Proxy0" , null , "java/lang/reflect/Proxy" , new String []{"com/example/asm/Foo" }); classWriter.visitSource("$Proxy0.java" , null ); { fieldVisitor = classWriter.visitField(ACC_STATIC, "foo" , "Ljava/lang/reflect/Method;" , null , null ); fieldVisitor.visitEnd(); } { methodVisitor = classWriter.visitMethod(ACC_PUBLIC, "<init>" , "(Ljava/lang/reflect/InvocationHandler;)V" , null , null ); methodVisitor.visitParameter("invocationHandler" , 0 ); methodVisitor.visitCode(); Label label0 = new Label (); methodVisitor.visitLabel(label0); methodVisitor.visitLineNumber(18 , label0); methodVisitor.visitVarInsn(ALOAD, 0 ); methodVisitor.visitVarInsn(ALOAD, 1 ); methodVisitor.visitMethodInsn(INVOKESPECIAL, "java/lang/reflect/Proxy" , "<init>" , "(Ljava/lang/reflect/InvocationHandler;)V" , false ); Label label1 = new Label (); methodVisitor.visitLabel(label1); methodVisitor.visitLineNumber(19 , label1); methodVisitor.visitInsn(RETURN); Label label2 = new Label (); methodVisitor.visitLabel(label2); methodVisitor.visitLocalVariable("this" , "Lcom/example/asm/$Proxy0;" , null , label0, label2, 0 ); methodVisitor.visitLocalVariable("invocationHandler" , "Ljava/lang/reflect/InvocationHandler;" , null , label0, label2, 1 ); methodVisitor.visitMaxs(2 , 2 ); methodVisitor.visitEnd(); } { methodVisitor = classWriter.visitMethod(ACC_PUBLIC, "foo" , "()V" , null , null ); methodVisitor.visitCode(); Label label0 = new Label (); Label label1 = new Label (); Label label2 = new Label (); methodVisitor.visitTryCatchBlock(label0, label1, label2, "java/lang/Throwable" ); methodVisitor.visitLabel(label0); methodVisitor.visitLineNumber(23 , label0); methodVisitor.visitVarInsn(ALOAD, 0 ); methodVisitor.visitFieldInsn(GETFIELD, "com/example/asm/$Proxy0" , "h" , "Ljava/lang/reflect/InvocationHandler;" ); methodVisitor.visitVarInsn(ALOAD, 0 ); methodVisitor.visitFieldInsn(GETSTATIC, "com/example/asm/$Proxy0" , "foo" , "Ljava/lang/reflect/Method;" ); methodVisitor.visitInsn(ACONST_NULL); methodVisitor.visitMethodInsn(INVOKEINTERFACE, "java/lang/reflect/InvocationHandler" , "invoke" , "(Ljava/lang/Object;Ljava/lang/reflect/Method;[Ljava/lang/Object;)Ljava/lang/Object;" , true ); methodVisitor.visitInsn(POP); methodVisitor.visitLabel(label1); methodVisitor.visitLineNumber(26 , label1); Label label3 = new Label (); methodVisitor.visitJumpInsn(GOTO, label3); methodVisitor.visitLabel(label2); methodVisitor.visitLineNumber(24 , label2); methodVisitor.visitFrame(Opcodes.F_SAME1, 0 , null , 1 , new Object []{"java/lang/Throwable" }); methodVisitor.visitVarInsn(ASTORE, 1 ); Label label4 = new Label (); methodVisitor.visitLabel(label4); methodVisitor.visitLineNumber(25 , label4); methodVisitor.visitTypeInsn(NEW, "java/lang/reflect/UndeclaredThrowableException" ); methodVisitor.visitInsn(DUP); methodVisitor.visitVarInsn(ALOAD, 1 ); methodVisitor.visitMethodInsn(INVOKESPECIAL, "java/lang/reflect/UndeclaredThrowableException" , "<init>" , "(Ljava/lang/Throwable;)V" , false ); methodVisitor.visitInsn(ATHROW); methodVisitor.visitLabel(label3); methodVisitor.visitLineNumber(27 , label3); methodVisitor.visitFrame(Opcodes.F_SAME, 0 , null , 0 , null ); methodVisitor.visitInsn(RETURN); Label label5 = new Label (); methodVisitor.visitLabel(label5); methodVisitor.visitLocalVariable("e" , "Ljava/lang/Throwable;" , null , label4, label3, 1 ); methodVisitor.visitLocalVariable("this" , "Lcom/example/asm/$Proxy0;" , null , label0, label5, 0 ); methodVisitor.visitMaxs(4 , 2 ); methodVisitor.visitEnd(); } { methodVisitor = classWriter.visitMethod(ACC_STATIC, "<clinit>" , "()V" , null , null ); methodVisitor.visitCode(); Label label0 = new Label (); Label label1 = new Label (); Label label2 = new Label (); methodVisitor.visitTryCatchBlock(label0, label1, label2, "java/lang/NoSuchMethodException" ); methodVisitor.visitLabel(label0); methodVisitor.visitLineNumber(32 , label0); methodVisitor.visitLdcInsn(Type.getType("Lcom/example/asm/Foo;" )); methodVisitor.visitLdcInsn("foo" ); methodVisitor.visitInsn(ICONST_0); methodVisitor.visitTypeInsn(ANEWARRAY, "java/lang/Class" ); methodVisitor.visitMethodInsn(INVOKEVIRTUAL, "java/lang/Class" , "getMethod" , "(Ljava/lang/String;[Ljava/lang/Class;)Ljava/lang/reflect/Method;" , false ); methodVisitor.visitFieldInsn(PUTSTATIC, "com/example/asm/$Proxy0" , "foo" , "Ljava/lang/reflect/Method;" ); methodVisitor.visitLabel(label1); methodVisitor.visitLineNumber(35 , label1); Label label3 = new Label (); methodVisitor.visitJumpInsn(GOTO, label3); methodVisitor.visitLabel(label2); methodVisitor.visitLineNumber(33 , label2); methodVisitor.visitFrame(Opcodes.F_SAME1, 0 , null , 1 , new Object []{"java/lang/NoSuchMethodException" }); methodVisitor.visitVarInsn(ASTORE, 0 ); Label label4 = new Label (); methodVisitor.visitLabel(label4); methodVisitor.visitLineNumber(34 , label4); methodVisitor.visitTypeInsn(NEW, "java/lang/NoSuchMethodError" ); methodVisitor.visitInsn(DUP); methodVisitor.visitVarInsn(ALOAD, 0 ); methodVisitor.visitMethodInsn(INVOKEVIRTUAL, "java/lang/NoSuchMethodException" , "getMessage" , "()Ljava/lang/String;" , false ); methodVisitor.visitMethodInsn(INVOKESPECIAL, "java/lang/NoSuchMethodError" , "<init>" , "(Ljava/lang/String;)V" , false ); methodVisitor.visitInsn(ATHROW); methodVisitor.visitLabel(label3); methodVisitor.visitLineNumber(36 , label3); methodVisitor.visitFrame(Opcodes.F_SAME, 0 , null , 0 , null ); methodVisitor.visitInsn(RETURN); methodVisitor.visitLocalVariable("e" , "Ljava/lang/NoSuchMethodException;" , null , label4, label3, 0 ); methodVisitor.visitMaxs(3 , 1 ); methodVisitor.visitEnd(); } classWriter.visitEnd(); return classWriter.toByteArray(); } }
编写测试方法使用 $Proxy0Dump 生成 $Proxy0 的 class 文件:
1 2 3 4 5 6 7 8 9 public class TestProxy { public static void main (String[] args) throws Exception { byte [] dump = $Proxy0Dump.dump(); FileOutputStream os = new FileOutputStream ("$Proxy0.class" ); os.write(dump, 0 , dump.length); os.close(); } }
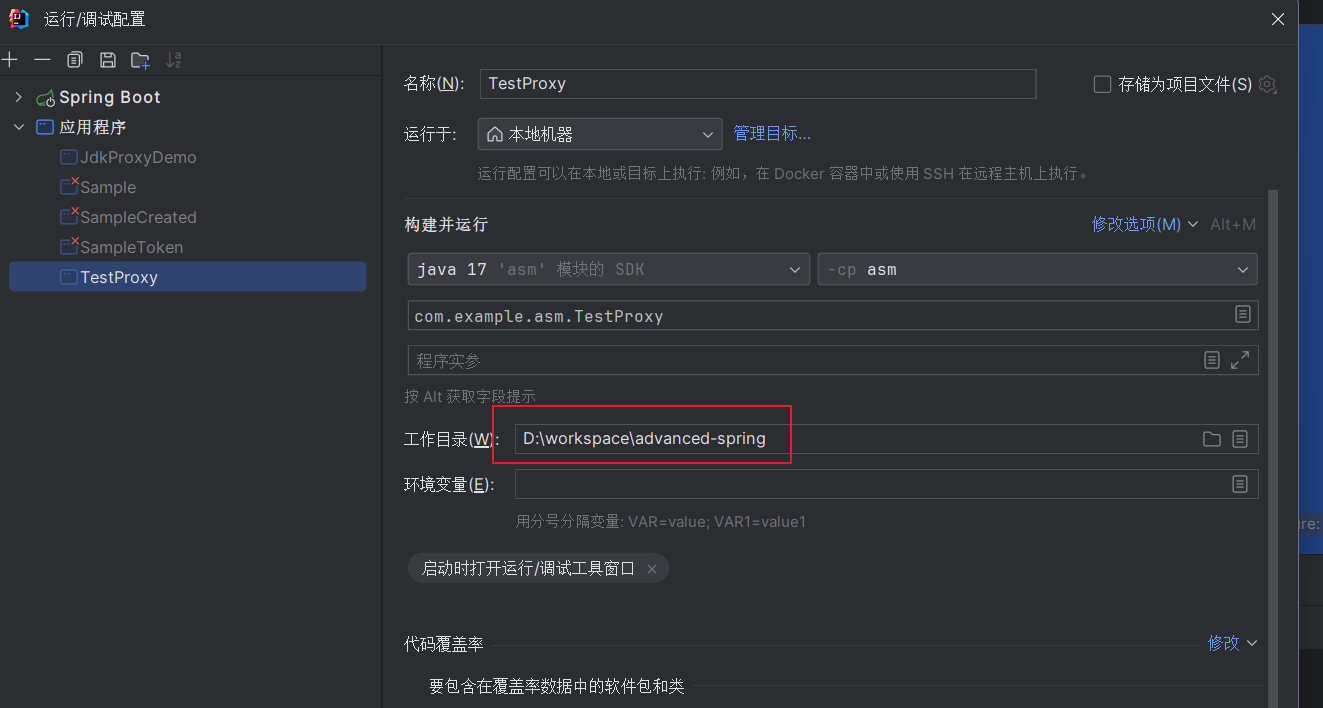
运行 main() 方法后,在工作目录下生成 $Proxy0.class。
也就是说会在 D:\Code\IdeaCode\advanced-spring 目录下生成 $Proxy0.class 文件,IDEA 反编译后的内容与手动编写的 $Proxy0.java 文件的内容无异。
实际使用时并不需要使用 $Proxy0Dump 生成 $Proxy.class 文件,而是利用 ClassLoader 直接加载类信息:
1 2 3 4 5 6 7 8 9 10 11 12 13 14 15 16 17 18 19 20 21 22 23 24 25 26 public class TestProxy { public static void main (String[] args) throws Exception { byte [] dump = $Proxy0Dump.dump(); ClassLoader classLoader = new ClassLoader () { @Override protected Class<?> findClass(String name) throws ClassNotFoundException { return super .defineClass(name, dump, 0 , dump.length); } }; Class<?> proxyClass = classLoader.loadClass("com.example.asm.$Proxy0" ); Constructor<?> constructor = proxyClass.getConstructor(InvocationHandler.class); Foo fooProxy = (Foo) constructor.newInstance((InvocationHandler) (proxy, method, args1) -> { System.out.println("before..." ); System.out.println("模拟调用目标" ); return null ; }); fooProxy.foo(); } }
JDK 反射优化 jdk 动态代理时,会使用反射调用方法:
1 2 3 4 5 6 7 8 9 10 11 12 13 14 15 16 17 18 19 20 21 22 23 24 25 26 27 28 29 30 31 32 33 34 35 36 37 38 39 40 41 42 43 44 45 package com.example.asm;import java.lang.reflect.Field;import java.lang.reflect.Method;public class TestMethodProxy { public static void main (String[] args) throws Exception { Method foo = TestMethodProxy.class.getMethod("foo" , int .class); for (int i = 1 ; i <= 17 ; i++) { show(i, foo); foo.invoke(null , i); } System.in.read(); } private static void show (int i, Method foo) throws Exception { Method getMethodAccessor = Method.class.getDeclaredMethod("getMethodAccessor" ); getMethodAccessor.setAccessible(true ); Object invoke = getMethodAccessor.invoke(foo); if (invoke == null ) { System.out.println(i + ": " + null ); return ; } Field delegate = Class.forName("jdk.internal.reflect.DelegatingMethodAccessorImpl" ).getDeclaredField("delegate" ); delegate.setAccessible(true ); System.out.println(i + ": " + delegate.get(invoke)); } public static void foo (int i) { System.out.println(i + ": foo" ); } }
1 2 3 4 5 6 7 8 9 10 11 12 13 14 15 16 17 18 19 20 21 22 23 24 25 26 27 28 29 30 31 32 33 34 35 36 已连接到地址为 ''127.0.0.1:63163',传输: '套接字'' 的目标虚拟机 1: null 1: foo 2: jdk.internal.reflect.NativeMethodAccessorImpl@5f184fc6 2: foo 3: jdk.internal.reflect.NativeMethodAccessorImpl@5f184fc6 3: foo 4: jdk.internal.reflect.NativeMethodAccessorImpl@5f184fc6 4: foo 5: jdk.internal.reflect.NativeMethodAccessorImpl@5f184fc6 5: foo 6: jdk.internal.reflect.NativeMethodAccessorImpl@5f184fc6 6: foo 7: jdk.internal.reflect.NativeMethodAccessorImpl@5f184fc6 7: foo 8: jdk.internal.reflect.NativeMethodAccessorImpl@5f184fc6 8: foo 9: jdk.internal.reflect.NativeMethodAccessorImpl@5f184fc6 9: foo 10: jdk.internal.reflect.NativeMethodAccessorImpl@5f184fc6 10: foo 11: jdk.internal.reflect.NativeMethodAccessorImpl@5f184fc6 11: foo 12: jdk.internal.reflect.NativeMethodAccessorImpl@5f184fc6 12: foo 13: jdk.internal.reflect.NativeMethodAccessorImpl@5f184fc6 13: foo 14: jdk.internal.reflect.NativeMethodAccessorImpl@5f184fc6 14: foo 15: jdk.internal.reflect.NativeMethodAccessorImpl@5f184fc6 15: foo 16: jdk.internal.reflect.NativeMethodAccessorImpl@5f184fc6 16: foo 17: jdk.internal.reflect.GeneratedMethodAccessor2@312b1dae 17: foo
从上述信息可知,第一次调用时没有使用 MethodAccessor 对象,从第二次到第十六次,使用了 NativeMethodAccessorImpl 对象,而在第十七次使用了 GeneratedMethodAccessor2 对象。
NativeMethodAccessorImpl 基于 Java 本地 API 实现,性能较低,第十七次调用换成 GeneratedMethodAccessor2 后,性能得到一定的提升。
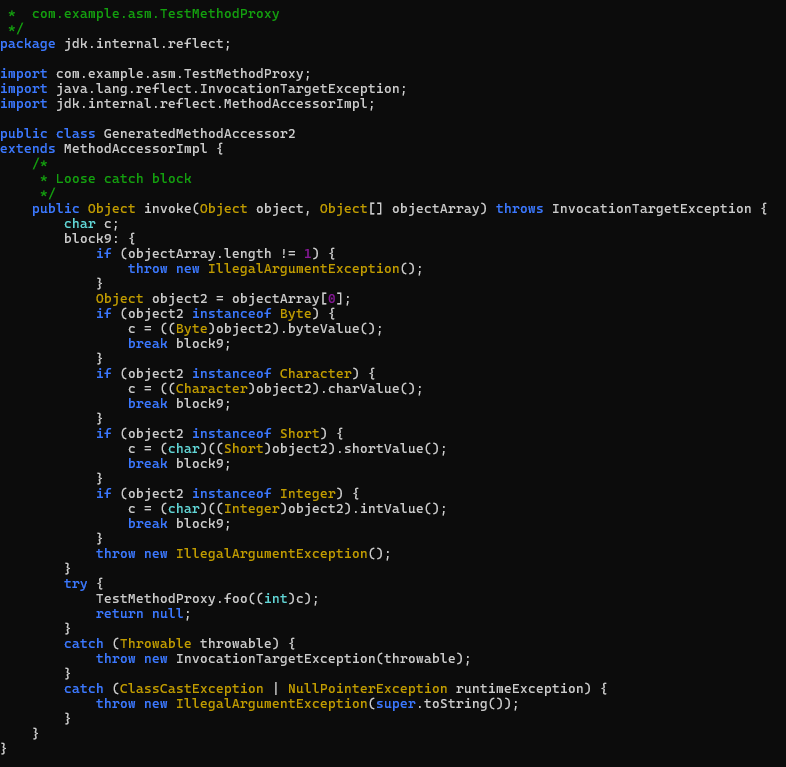
使用 Arthas 反编译查看 GeneratedMethodAccessor2 类中的信息,
1 TestMethodProxy.foo((int)c);
因此性能得到了提升,但这样的提升也是有一定代价的:为优化 一个 方法的反射调用,生成了一个 GeneratedMethodAccessor2 代理类。
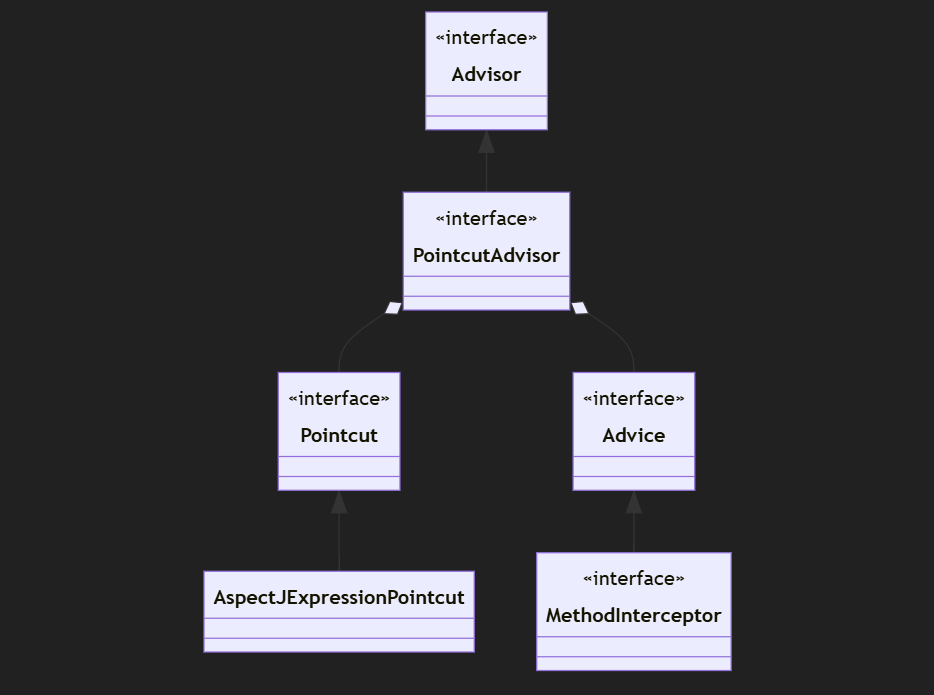
CGLib 代理 MethodProxy 原理 JDK 和 CGLib 的统一 advisor 切面有 aspect 和 advisor 两个概念,aspect 是多组通知(advice)和切点(pointcut)的组合,也是实际编码时使用的,
Spring 中的切点、通知、切面的抽象如下:
切点:Ponintcut,其典型实现是 AspectJExpressionPonintcut
通知:Advice,其典型子类接口是 MethodInterceptor ,表示环绕通知
切面:Advisor,仅包含一个切点和通知
切面与代理对象的创建 通过以下四步创建 切面 和 代理:
备好切点
备好通知
备好切面
创建代理
在 spring 中,切点通过接口 org.springframework.aop.Pointcut 表示
1 2 3 4 5 6 7 8 9 10 11 12 13 14 15 16 17 18 19 public interface Pointcut { ClassFilter getClassFilter () ; MethodMatcher getMethodMatcher () ; Pointcut TRUE = TruePointcut.INSTANCE; }
Pointcut 接口有很多实现类,比如:
AnnotationMatchingPointcut:通过注解进行匹配
AspectJExpressionPointcut:通过 AspectJ 表达式进行匹配(本节的选择)
在 spring 中,通知 的表示有很多接口,org.aopalliance.intercept.MethodInterceptor,这个接口实现的通知属于环绕通知。
在 Spring 中,切面的实现也有很多,在此选择 DefaultPointcutAdvisor,创建这种切面时,传递一个节点和通知。
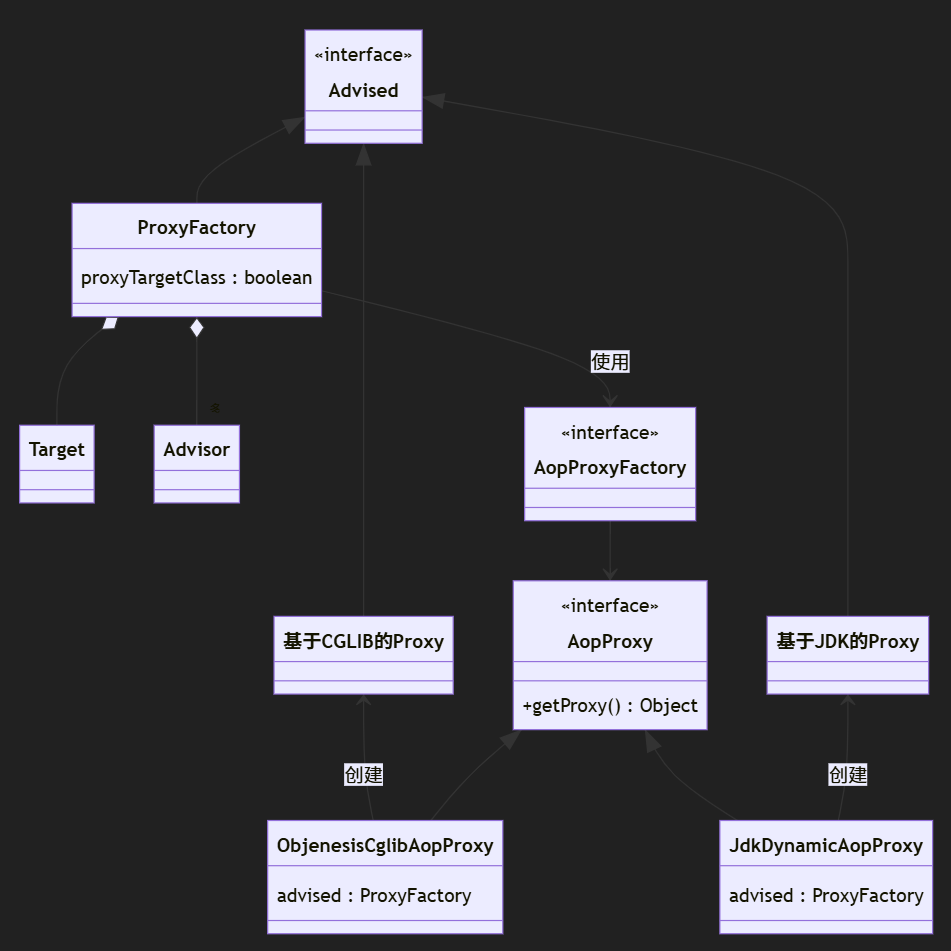
最后创建代理对象时,无需显式实现 JDK 动态代理或 CGLib 动态代理,Spring 提供了名为 ProxyFactory 的工厂,其内部通过不同的情况选择不同的代理实现,更方便地创建代理对象。
1 2 3 4 5 6 7 8 9 10 11 12 13 14 15 16 17 18 19 20 21 22 23 24 25 26 27 28 29 30 31 32 33 34 35 36 37 38 39 40 41 42 43 44 45 46 47 48 49 50 51 52 53 54 55 56 57 58 59 60 61 62 63 64 interface I1 { void foo () ; void bar () ; } static class Target1 implements I1 { @Override public void foo () { System.out.println("target1 foo" ); } @Override public void bar () { System.out.println("target1 bar" ); } } static class Target2 { public void foo () { System.out.println("target2 foo" ); } public void bar () { System.out.println("target2 bar" ); } } public static void main (String[] args) { AspectJExpressionPointcut pointcut = new AspectJExpressionPointcut (); pointcut.setExpression("execution(* foo())" ); MethodInterceptor advice = invocation -> { System.out.println("before..." ); Object result = invocation.proceed(); System.out.println("after..." ); return result; }; DefaultPointcutAdvisor advisor = new DefaultPointcutAdvisor (pointcut, advice); Target1 target = new Target1 (); ProxyFactory factory = new ProxyFactory (); factory.setTarget(target); factory.addAdvisor(advisor); I1 proxy = (I1) factory.getProxy(); System.out.println(proxy.getClass()); proxy.foo(); proxy.bar(); }
1 2 3 4 5 class indi.mofan.a15.A15$Target1$$EnhancerBySpringCGLIB$$381723d1 before... target1 foo after... target1 bar
foo() 方法被增强,但 bar() 并没有,并且选择了 CGLib 动态代理作为代理的实现。
spring 根据什么信息选择不同的代理? ProxyFactory 的父类 ProxyConfig 中有个名为 proxyTargetClass 的布尔类型成员变量:
当 proxyTargetClass == false,并且目标对象所在类实现了接口时,将选择 JDK 动态代理;
当 proxyTargetClass == false,但目标对象所在类未实现接口时,将选择 CGLib 动态代理;
当 proxyTargetClass == true,总是选择 CGLib 动态代理。
上文中的 target 对象的所在类 Targer1 实现了 I1 接口,最终为什么依旧选择了 CGLib 动态代理作为代理类的创建方式呢?
1 factory.setInterfaces(target.getClass().getInterfaces());
1 2 3 4 5 class indi.mofan.a15.$Proxy0 before... target1 foo after... target1 bar
此时选择的动态代理实现方式是 JDK 动态代理。
再设置 factory 对象的 proxyTargetClass 为 true:
1 factory.setProxyTargetClass(true );
1 2 3 4 5 class indi.mofan.a15.A15$Target1$$EnhancerBySpringCGLIB$$34c2d9b8 before... target1 foo after... target1 bar
再将 proxyTargetClass 的值修改回 false,并修改目标对象的所在类为 Target2,Target2 并未实现任何接口:
1 2 3 4 5 6 7 8 9 10 11 12 13 14 15 16 public static void main (String[] args) { Target2 target = new Target2 (); ProxyFactory factory = new ProxyFactory (); factory.setTarget(target); factory.addAdvisor(advisor); factory.setInterfaces(target.getClass().getInterfaces()); factory.setProxyTargetClass(false ); Target2 proxy = (Target2) factory.getProxy(); System.out.println(proxy.getClass()); proxy.foo(); proxy.bar(); }
1 2 3 4 5 class indi.mofan.a15.A15$Target2$$EnhancerBySpringCGLIB$$4bb2ac74 before... target2 foo after... target2 bar
ProxyFactory 是用来创建代理的核心实现,使用 AopProxyFactory 选择具体的代理实现:
JdkDynamicAopProxy
ObjenesisCglibAopProxy
AopProxyFactory 根据 proxyTargetClass 等设置选择 AopProxy 实现,AopProxy 通过 getProxy() 方法创建代理对象。
调用代理方法时,会借助 ProxyFactory 统一将通知转换为环绕通知 MethodInterceptor。
切点匹配的方法 AspectJExpressionPointcut 作为切点的实现,判断编写的 AspectJ 表达式是否与某一方法匹配可以用 matches() 方法
1 2 3 4 5 6 7 8 9 10 11 12 13 14 15 16 17 18 19 20 21 22 public static void main (String[] args) throws NoSuchMethodException { AspectJExpressionPointcut pt1 = new AspectJExpressionPointcut (); pt1.setExpression("execution(* bar())" ); System.out.println(pt1.matches(T1.class.getMethod("foo" ), T1.class)); System.out.println(pt1.matches(T1.class.getMethod("bar" ), T1.class)); AspectJExpressionPointcut pt2 = new AspectJExpressionPointcut (); pt2.setExpression("@annotation(org.springframework.transaction.annotation.Transactional)" ); System.out.println(pt2.matches(T1.class.getMethod("foo" ), T1.class)); System.out.println(pt2.matches(T1.class.getMethod("bar" ), T1.class)); } static class T1 { @Transactional public void foo () { } public void bar () { } }
@Transactional 是 Spring 中使用频率非常高的注解,那它底层是通过 AspectJExpressionPointcut 与 @annotation() 切点表达式相结合对目标方法进行匹配的吗?
答案是否定的。@Transactional 注解除了可以作用在方法上,还可以作用在类(或接口)上。
在底层 @Transactional 注解的匹配使用到了 StaticMethodMatcherPointcut,在此模拟一下:
1 2 3 4 5 6 7 8 9 10 11 12 13 14 15 16 17 18 19 20 21 22 23 24 25 26 27 28 29 30 31 32 33 34 35 36 37 38 39 40 41 42 43 44 45 46 47 48 49 50 51 public static void main (String[] args) throws NoSuchMethodException { StaticMethodMatcherPointcut pt3 = new StaticMethodMatcherPointcut () { @Override public boolean matches (Method method, Class<?> targetClass) { MergedAnnotations annotations = MergedAnnotations.from(method); if (annotations.isPresent(Transactional.class)) { return true ; } annotations = MergedAnnotations.from(targetClass, MergedAnnotations.SearchStrategy.TYPE_HIERARCHY); return annotations.isPresent(Transactional.class); } }; System.out.println(pt3.matches(T1.class.getMethod("foo" ), T1.class)); System.out.println(pt3.matches(T1.class.getMethod("bar" ), T1.class)); System.out.println(pt3.matches(T2.class.getMethod("foo" ), T2.class)); System.out.println(pt3.matches(T3.class.getMethod("foo" ), T3.class)); } static class T1 { @Transactional public void foo () { } public void bar () { } } @Transactional static class T2 { public void foo () { } } @Transactional interface I3 { void foo () ; } static class T3 implements I3 { @Override public void foo () { } }
无论是 AspectJExpressionPointcut 还是 StaticMethodMatcherPointcut,它们都实现了 MethodMatcher 接口,用来执行方法的匹配。
从@Aspect 到 Advisor @Aspect 是高级切面,Advisor 是低级切面,在运行时会将高级转为低级。
高级切面中与通知类型相关的常用注解有 5 个
@Befor 前置通知@AfterReturning 后置通知@AfterThrowing 异常通知@After 最终通知@Around 环绕通知
AnnotationAwareAspectAutoProxyCreator 准备如下类
两个目标类
一个使用@Aspect 的高级切面
一个利用配置类实现的低级切面 Advisor
1 2 3 4 5 6 7 8 9 10 11 12 13 14 15 16 17 18 19 20 21 22 23 24 25 26 27 28 29 30 31 32 33 34 35 36 37 38 39 40 41 42 43 44 45 46 47 48 49 50 51 52 53 54 55 56 57 58 59 60 61 public class A17 { static class Target1 { public void foo () { System.out.println("target1 foo" ); } } static class Target2 { public void bar () { System.out.println("target2 bar" ); } } @Aspect static class MyAspect { @Before("execution(* com.example.aop.a17.A17.Target1.foo())") public void before () { System.out.println("aspect1 before..." ); } @After("execution(* com.example.aop.a17.A17.Target1.foo())") public void after () { System.out.println("aspect1 after..." ); } } @Configuration static class Config { @Bean public Advisor advisor () { AspectJExpressionPointcut pointcut = new AspectJExpressionPointcut (); pointcut.setExpression("execution(* com.example.aop.a17.A17.Target1.foo())" ); MethodInterceptor adivce3 = invocation -> { System.out.println("adivce3 before" ); Object result = invocation.proceed(); System.out.println("adivce3 after" ); return result; }; DefaultPointcutAdvisor defaultPointcutAdvisor = new DefaultPointcutAdvisor (); defaultPointcutAdvisor.setPointcut(pointcut); defaultPointcutAdvisor.setAdvice(adivce3); return defaultPointcutAdvisor; } } }
编写 main() 方法创建 spring 容器,并添加必要的 Bean:
1 2 3 4 5 6 7 8 9 10 11 public static void main (String[] args) { GenericApplicationContext context = new GenericApplicationContext (); context.registerBean(Target1.class); context.registerBean(Config.class); context.registerBean(ConfigurationClassPostProcessor.class); context.refresh(); for (String beanDefinitionName : context.getBeanDefinitionNames()) { System.out.println(beanDefinitionName); } }
1 2 3 4 com.example.aop.a17.A17$Target1 com.example.aop.a17.A17$Config org.springframework.context.annotation.ConfigurationClassPostProcessor advisor
Spring 中存在名为 AnnotationAwareAspectJAutoProxyCreator 的 Bean 后置处理器(虽然这个类后缀没有 BeanPostProcessor ,但是他实现了BeanPostProcessor )
AnnotationAwareAspectJAutoProxyCreator 有两个作用:
找到容器中所有的切面,针对高级切面,将其转换为低级切面
根据切面信息,利用 ProxyFactory 创建代理对象
AnnotationAwareAspectJAutoProxyCreator 实现了BeanPostProcessor ,可以在 Bean 的生命周期一些阶段对 Bean 扩展。可以在** 依赖注入之前 **** *或者 Bean 初始化之后 * **对 Bean 扩展。
AnnotationAwareAspectJAutoProxyCreator 有两个重要的方法:
findEligibleAdvisors() :位于父类AbstractAdvisorAutoProxyCreator 中,找到符合条件的切面类。低级切面直接添加,高级切面转换低级切面再添加。wrapIfNecessary() :位于父类 AbstractAutoProxyCreator 中,用于将有资格被代理的 Bean 进行包装,即创建代理对象。
findEligibleAdvisors() findEligibleAdvisors() 方法接收两个参数:
beanClass 配合切面使用的目标类 Class 信息
beanName 当前被代理的 Bean 名称
修改 mian() 方法,向容器添加 AnnotationAwareAspectJAutoProxyCreator 后置处理器,测试 findEligibleAdvisors() 方法:
1 2 3 4 5 6 7 8 9 10 11 12 13 14 15 16 17 18 19 20 21 22 23 24 public static void main (String[] args) { GenericApplicationContext context = new GenericApplicationContext (); context.registerBean(MyAspect.class); context.registerBean(Config.class); context.registerBean(ConfigurationClassPostProcessor.class); context.registerBean(AnnotationAwareAspectJAutoProxyCreator.class); context.refresh(); for (String beanDefinitionName : context.getBeanDefinitionNames()) { } AnnotationAwareAspectJAutoProxyCreator creator = context.getBean(AnnotationAwareAspectJAutoProxyCreator.class); List<Advisor> advisors = creator.findEligibleAdvisors(Target1.class, "target1" ); for (Advisor advisor : advisors) { System.out.println(advisor); } }
1 2 3 4 org.springframework.aop.interceptor.ExposeInvocationInterceptor.ADVISOR InstantiationModelAwarePointcutAdvisor: expression [execution(* foo())]; advice method [public void org.springframework.aop.framework.autoproxy.A17$MyAspect.before()]; perClauseKind=SINGLETON InstantiationModelAwarePointcutAdvisor: expression [execution(* foo())]; advice method [public void org.springframework.aop.framework.autoproxy.A17$MyAspect.after()]; perClauseKind=SINGLETON org.springframework.aop.support.DefaultPointcutAdvisor: pointcut [AspectJExpressionPointcut: () execution(* org.springframework.aop.framework.autoproxy.A17.Target1.foo())]; advice [org.springframework.aop.framework.autoproxy.A17$Config$$Lambda$118/0x00000249b01134c8@264f218]
打印出 4 个配合 Target1 使用的切面信息:
第一个切面 ExposeInvocationInterceptor.ADVISOR 是 Spring 为每个代理对象都会添加的切面;
第二个切面 DefaultPointcutAdvisor 是自行编写的低级切面(Config 类里的);
第三个和第四个切面 InstantiationModelAwarePointcutAdvisor 是由高级切面转换得到的两个低级切面(高级切面里的每个通知 都会 转换为一个 低级切面)。
若按照 creator.findEligibleAdvisors(Target2.class, “target2”) 的方式进行调用,控制台不会打印出任何信息,因为没有任何切面能够配合 Target2 使用。
wrapIfNecessary() wrapIfNecessary() 方法内部调用了 findEligibleAdvisors() 方法,若 findEligibleAdvisors() 方法返回的集合不为空,则表示需要创建代理对象。
如果需要创建对象,wrapIfNecessary() 方法返回的是代理对象,否则仍然是原对象。
wrapIfNecessary() 方法接收三个参数:
bean:原始 Bean 实例
beanName:Bean 名称
cacheKey:用于元数据访问缓存 Key
1 2 3 4 5 6 7 8 9 10 public static void main (String[] args) { Object o1 = creator.wrapIfNecessary(new Target1 (), "target1" , "target1" ); System.out.println(o1.getClass()); Object o2 = creator.wrapIfNecessary(new Target2 (), "target2" , "target2" ); System.out.println(o2.getClass()); context.close(); }
1 2 class org.springframework.aop.framework.autoproxy.A17$Target1$$SpringCGLIB$$0 class org.springframework.aop.framework.autoproxy.A17$Target2
Target1 对象是被代理的,而 Target2 依旧是原对象。
如果将 o1 转换为 Target1,并调用 foo() 方法,foo() 方法将被增强:
1 2 3 4 5 6 7 public static void main (String[] args) { ((Target1) o1).foo(); context.close(); }
1 2 3 4 5 adivce3 before aspect1 before... target1 foo aspect1 after... adivce3 after
其中 adivce3 before adivce3 after 是低级切面的增强,aspect1 before… aspect1 after… 是高级切面的增强
切面的顺序控制 根据上述打印信息,低级切面 比 高级切面 先执行,这个执行顺序是可以控制的。
对于 高级切面来说, 可以在类上使用 @Order 注解,比如:
1 2 3 4 5 6 7 8 9 10 11 12 13 @Aspect @Order(1) static class Aspect1 { @Before("execution(* foo())") public void before () { System.out.println("aspect1 before..." ); } @After("execution(* foo())") public void after () { System.out.println("aspect1 after..." ); } }
高级切面中,@Order 只有放在类上才生效,放在方法上不会生效。比如高级切面中有多个前置通知,这些前置通知对应的方法上使用 @Order 注解是无法生效的。
针对低级切面,需要设置 advisor 的 order 值,而不是向高级切面那样使用 @Order 注解,使用 @Order 注解设置在 **advisor3() **方法上是无用的:
1 2 3 4 5 6 7 8 9 10 11 12 13 14 15 16 17 @Configuration static class Config { @Bean public Advisor advisor3 (MethodInterceptor advice3) { AspectJExpressionPointcut pointcut = new AspectJExpressionPointcut (); pointcut.setExpression("execution(* foo())" ); DefaultPointcutAdvisor advisor = new DefaultPointcutAdvisor (pointcut, advice3); advisor.setOrder(2 ); return advisor; } }
设置完成后,高级切面的执行优先级高于低级切面。执行 main() 方法验证执行顺序是否改变:
1 2 3 4 5 aspect1 before... adivce3 before target1 foo adivce3 after aspect1 after...
代理对象创建时机 使用 AnnotationAwareAspectJAutoProxyCreator Bean 后置处理器创建代理对象的时机有以下两个选择:
这两个时机二选一,不会重复创建代理对象
Bean 依赖注入之前 1 2 3 4 5 6 7 8 9 10 11 12 13 14 15 16 17 18 19 20 21 22 23 24 25 26 27 28 29 30 31 32 33 34 35 36 37 38 39 40 41 42 43 44 45 46 47 48 49 50 51 52 53 54 55 56 57 58 59 60 61 62 63 64 65 66 67 68 69 70 71 72 73 74 75 76 77 78 79 80 81 82 83 84 85 86 87 88 89 90 91 92 93 94 95 96 97 98 99 100 101 102 103 104 105 106 107 108 109 110 111 112 113 114 115 package org.springframework.aop.framework.autoproxy;import jakarta.annotation.PostConstruct;import org.aopalliance.intercept.MethodInterceptor;import org.aopalliance.intercept.MethodInvocation;import org.springframework.aop.Advisor;import org.springframework.aop.aspectj.AspectJExpressionPointcut;import org.springframework.aop.aspectj.annotation.AnnotationAwareAspectJAutoProxyCreator;import org.springframework.aop.support.DefaultPointcutAdvisor;import org.springframework.beans.factory.annotation.Autowired;import org.springframework.beans.factory.annotation.AutowiredAnnotationBeanPostProcessor;import org.springframework.context.annotation.Bean;import org.springframework.context.annotation.CommonAnnotationBeanPostProcessor;import org.springframework.context.annotation.Configuration;import org.springframework.context.annotation.ConfigurationClassPostProcessor;import org.springframework.context.support.GenericApplicationContext;public class A17_1 代理创建的时机 { public static void main (String[] args) { GenericApplicationContext context = new GenericApplicationContext (); context.registerBean(ConfigurationClassPostProcessor.class); context.registerBean(Config.class); context.refresh(); context.close(); } @Configuration static class Config { @Bean public static AnnotationAwareAspectJAutoProxyCreator annotationAwareAspectJAutoProxyCreator () { return new AnnotationAwareAspectJAutoProxyCreator (); } @Bean public static AutowiredAnnotationBeanPostProcessor autowiredAnnotationBeanPostProcessor () { return new AutowiredAnnotationBeanPostProcessor (); } @Bean public static CommonAnnotationBeanPostProcessor commonAnnotationBeanPostProcessor () { return new CommonAnnotationBeanPostProcessor (); } @Bean public static Advisor advisor () { AspectJExpressionPointcut pointcut = new AspectJExpressionPointcut (); pointcut.setExpression("execution(* foo())" ); MethodInterceptor interceptor = new MethodInterceptor () { @Override public Object invoke (MethodInvocation invocation) throws Throwable { System.out.println("before" ); return invocation.proceed(); } }; return new DefaultPointcutAdvisor (pointcut, interceptor); } @Bean public static Bean1 bean1 () { return new Bean1 (); } @Bean public static Bean2 bean2 () { return new Bean2 (); } } static class Bean1 { public void foo () {} public Bean1 () { System.out.println("Bean1()" ); } @PostConstruct public void init () { System.out.println("Bean1 init()" ); } } static class Bean2 { public Bean2 () { System.out.println("Bean2()" ); } @Autowired public void setBean1 (Bean1 bean1) { System.out.println("Bean2 setBean1(bean1) class is: " + bean1.getClass()); } @PostConstruct public void init () { System.out.println("Bean2 init()" ); } } }
1 2 3 4 5 6 7 8 9 10 11 已连接到地址为 ''127.0.0.1:53708',传输: '套接字'' 的目标虚拟机 [TRACE] 09:06:24.481 [main] o.s.a.a.a.AnnotationAwareAspectJAutoProxyCreator - Did not attempt to auto-proxy infrastructure class [org.springframework.aop.Advisor] Bean1() Bean1 init() AnnotationAwareAspectJAutoProxyCreator - Creating implicit proxy for bean 'bean1' with 0 common interceptors and 2 specific interceptors Bean2() Bean2 setBean1(bean1) class is: class org.springframework.aop.framework.autoproxy.A17_1代理创建的时机$Bean1$$SpringCGLIB$$0 Bean2 init() 已与地址为 ''127.0.0.1:53708',传输: '套接字'' 的目标虚拟机断开连接 进程已结束,退出代码为 0
bean1 初始化后,打印了
1 AnnotationAwareAspectJAutoProxyCreator - Creating implicit proxy for bean 'bean1' with 0 common interceptors and 2 specific interceptors
表示 bean1 创建了隐式代理。
此时代理对象在 Bean 初始化完成之后创建。
Bean 初始化完成之后 现在改变 bean1,添加 setBean2() 方法,表示向 bean1 中注入 bean2,
1 2 3 4 5 6 7 8 9 10 11 12 13 14 static class Bean1 { public void foo () {} public Bean1 () { System.out.println("Bean1()" ); } @Autowired public void setBean2 (Bean2 bean2) { System.out.println("Bean1 setBean2(bean2) class is: " + bean2.getClass()); } @PostConstruct public void init () { System.out.println("Bean1 init()" ); } }
此时出现循环依赖。
1 2 3 4 5 6 7 Bean1() Bean2() AnnotationAwareAspectJAutoProxyCreator - Creating implicit proxy for bean 'bean1' with 0 common interceptors and 2 specific interceptors Bean2 setBean1 (bean1) class is : class org .springframework.aop.framework.autoproxy.A17_1代理创建的时机$Bean1$$SpringCGLIB$$0 Bean2 init () Bean1 setBean1 (bean2) class is : class org .springframework.aop.framework.autoproxy.A17_1代理创建的时机$Bean2 Bean1 init ()
首先进行 bean1 的实例化,然后进行 bean1 的依赖注入,但此时容器中并没有 bean2,因此需要进行 bean2 的实例化。
接下来进行 bean2 的依赖注入,向 bean2 中注入 bean1,注入的 bean1 应该是被增强的,即它的代理对象,因此创建 bean1 的代理对象后再完成 bean2 的依赖注入。
接着继续 bean2 的生命周期,完成 bean2 的初始化阶段,最后回到 bean1 的依赖注入阶段,向 bean1 中注入 bean2,最后完成 bean1 的初始化阶段。
总结 代理对象的创建时机:
无循环依赖时,在 Bean 初始化阶段之后创建
有循环依赖时,在 Bean 实例化后,依赖注入之前创建,讲代理对象存于二级缓存
Bean 的依赖注入阶段和初始化阶段不应该被增强,仍应被施加于原始对象。
高级切面转低级切面 调用 AnnotationAwareAspectJAutoProxyCreator 对象的 findEligibleAdvisors() 方法时,
获取能配合目标 Class 使用的切面,最终返回 Advisor 列表。
在搜索过程中如果碰到高级切面 @Aspect 讲其转成低级切面。
现有切面类与目标类如下:
1 2 3 4 5 6 7 8 9 10 11 12 13 14 15 16 17 18 19 20 21 22 23 24 25 26 27 28 29 30 31 32 33 34 35 36 37 38 39 40 41 42 43 44 45 46 47 48 49 50 51 52 53 54 55 56 57 58 59 60 61 62 63 64 65 66 67 68 69 70 71 72 73 74 75 76 77 78 79 80 81 82 83 84 85 86 87 88 89 90 package org.springframework.aop.framework.autoproxy;import org.aspectj.lang.ProceedingJoinPoint;import org.aspectj.lang.annotation.Before;import org.springframework.aop.Advisor;import org.springframework.aop.aspectj.AspectInstanceFactory;import org.springframework.aop.aspectj.AspectJExpressionPointcut;import org.springframework.aop.aspectj.AspectJMethodBeforeAdvice;import org.springframework.aop.aspectj.SingletonAspectInstanceFactory;import org.springframework.aop.support.DefaultPointcutAdvisor;import java.lang.reflect.Method;import java.util.ArrayList;import java.util.List;public class A17_2 高级切面转低级切面 { static class Aspect { @Before("execution(* foo(..))") public void before1 () { System.out.println("before1" ); } @Before("execution(* foo(..))") public void before2 () { System.out.println("before2" ); } public void after () { System.out.println("after" ); } public void afterReturning () { System.out.println("afterReturning" ); } public void afterThrowing () { System.out.println("afterThrowing" ); } public void around (ProceedingJoinPoint joinPoint) throws Throwable { System.out.println("around...before" ); try { joinPoint.proceed(); } finally { System.out.println("around...after" ); } } } static class Target { public void foo () { System.out.println("target foo" ); } } public static void main (String[] args) { AspectInstanceFactory singletonAspectInstanceFactory = new SingletonAspectInstanceFactory (new Aspect ()); ArrayList<Advisor> advisorArrayList = new ArrayList <>(); for (Method method : Aspect.class.getDeclaredMethods()) { if (method.isAnnotationPresent(Before.class)){ String exprssion = method.getAnnotation(Before.class).value(); AspectJExpressionPointcut pointcut = new AspectJExpressionPointcut (); pointcut.setExpression(exprssion); AspectJMethodBeforeAdvice advice = new AspectJMethodBeforeAdvice (method, pointcut, singletonAspectInstanceFactory); DefaultPointcutAdvisor defaultPointcutAdvisor = new DefaultPointcutAdvisor (pointcut, advice); advisorArrayList.add(defaultPointcutAdvisor); } } for (Advisor advisor : advisorArrayList) { System.out.println(advisor); System.out.println(); } } }
1 2 3 org.springframework.aop.support.DefaultPointcutAdvisor: pointcut [AspectJExpressionPointcut: () execution(* foo(..))]; advice [org.springframework.aop.aspectj.AspectJMethodBeforeAdvice: advice method [public void org.springframework.aop.framework.autoproxy.A17_2高级切面转低级切面$Aspect.before2()]; aspect name '' ] org.springframework.aop.support.DefaultPointcutAdvisor: pointcut [AspectJExpressionPointcut: () execution(* foo(..))]; advice [org.springframework.aop.aspectj.AspectJMethodBeforeAdvice: advice method [public void org.springframework.aop.framework.autoproxy.A17_2高级切面转低级切面$Aspect.before1()]; aspect name '' ]
@Befor 标记的前置通知会被转换成原始的 AspectJMethodBeforAdvice 形式,该对象包含了以下信息:
通知对应的方法信息
切点信息
通知对象如何创建,本例公用一个 Aspect 对象
通知相关最佳与原始通知类对应关系如下:
注解
对应原始通知类
@Before
AspectJMethodBeforeAdvice
@AfterReturning
AspectJAfterReturningAdvice
@AfterThrowing
AspectJAfterThrowingAdvice
@After
AspectJAfterAdvice
@Around
AspectJAroundAdvice
静态通知调用 动态通知调用